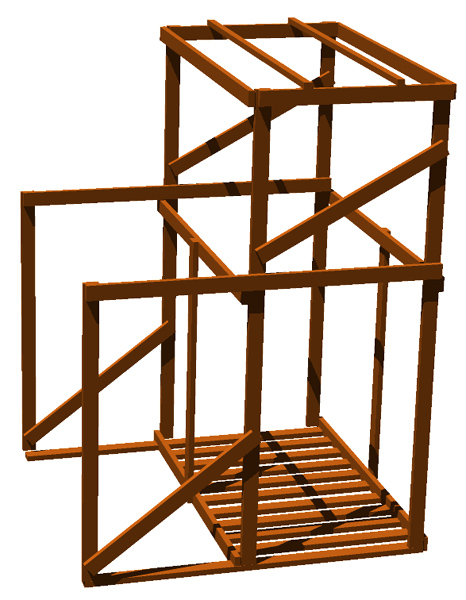
I wanted the frame of the room to be very strong. I felt this was important because I was not sure how the kids would react to being locked in a small room with spikes lowering from the ceiling. I imagined kids banging on the walls and doors. They didn't, but maybe I just got lucky. Anyway, I made the room strong enough to take a beating. I started with the frame. I made a 7' x 4' x 10' box out of two-by-fours similar to the figure shown. I used plenty of cross-bars. I felt it best to make a complete box rather than an upside down U so I attached several two-by-fours on the bottom and laid a 4' x 7' sheet of peg board over top. I used peg board rather than a sheet of solid hard board because I learned a trick the year before. By putting red Christmas lights under the peg board, I can illuminate the floor without casting much light into the room itself. Therefore, the kids can walk into a very dark room and not crash into the walls. I wanted to keep the skull ceiling dark until the last minute. Since I am very paranoid about someone tripping in the dark, I made a two-foot long ramp going up into the room even though the floor was raised less than two inches. I made a front and back sliding door (I could open them from outside the room but there are no door handles to open them from inside the room) and used hardboard panels from Home Depot (about $7 for a 4' x 8' sheet) to close up the room. Before I put on all the walls, though, I needed to hang the ceiling.
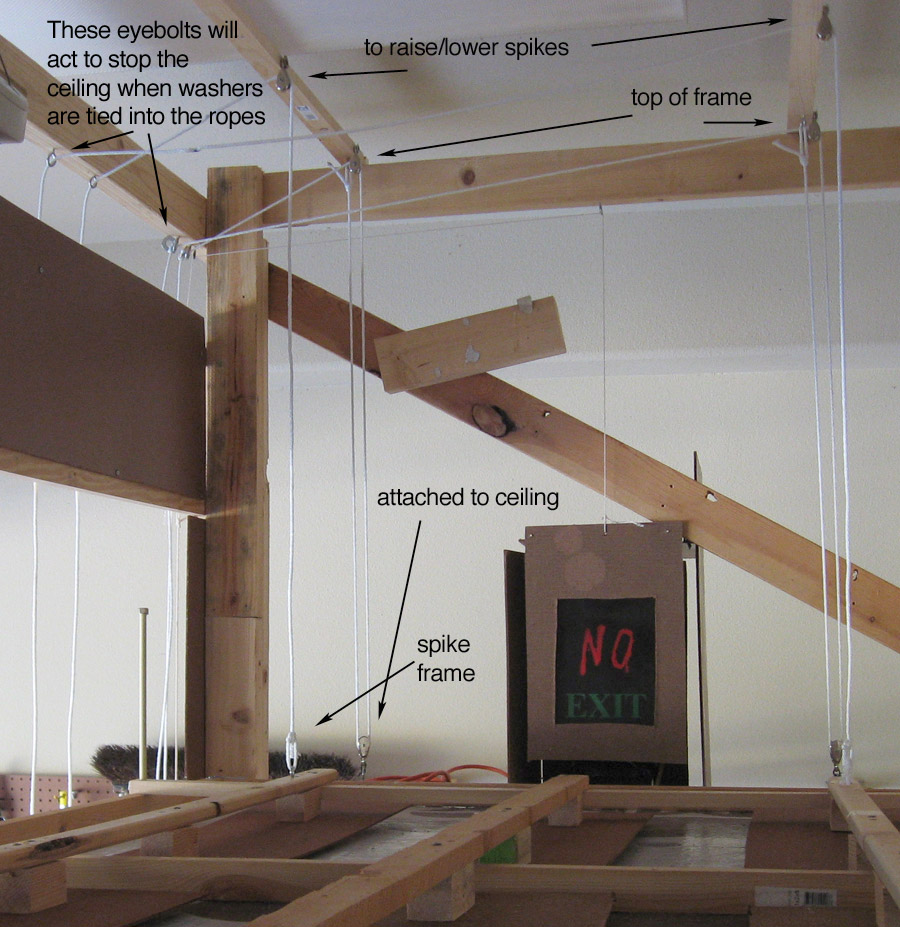
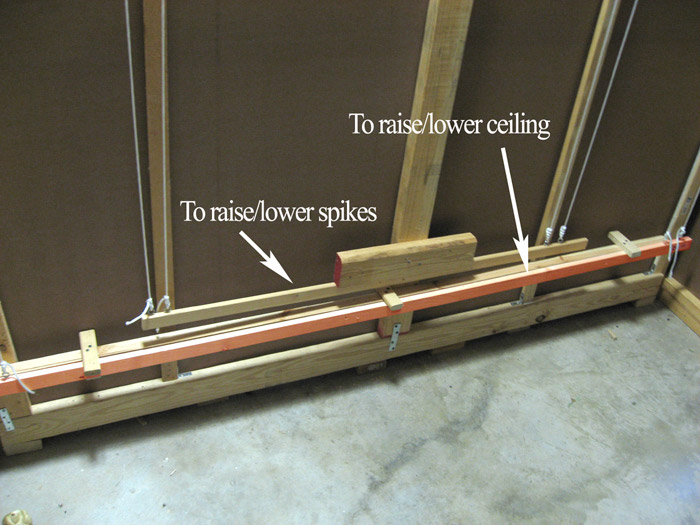
Since the ceiling was dropping only about 3 feet in total, I could double up the ropes to make raising and lowing the ceiling much easier (a simple physics trick). I attached the ropes to the top of the frame using eye bolts, ran the rope down to the ceiling, where I attached a set of the small hanging pulleys. The ropes fed through the pulleys and back up the top of the frame, through a second set of pulleys then down the side of the frame. I did not double up the ropes for the spikes. The pulleys at the top of the frame were attached so that they would not swing or move when someone applied tension on the ropes. This way, the ceiling did not move side-to-side when tension was applied.
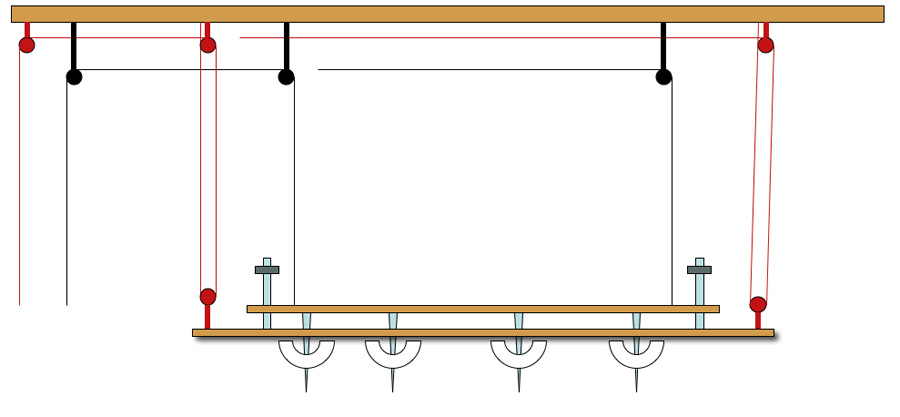
Here is a diagram for the above picture, just to clarify the approach.
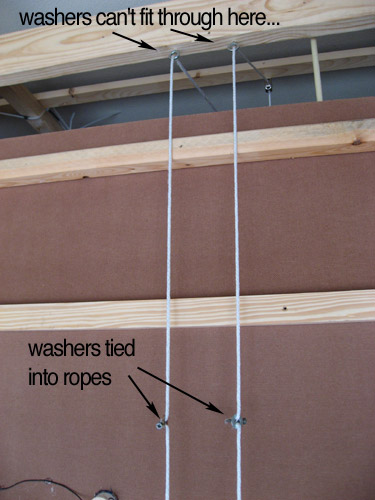
I now had eight ropes to pull (four for the corners of the ceiling and four for the corners of the spike frame). Before I could attached them to anything, I needed to balance the ceiling and frame. I moved the ceiling to what would be its lowest point and supported it from below. After making sure the ceiling was level, I put tension on the ropes and marked with a Sharpy were the ropes touched the outer eyebolts. I released the tension on the ropes and tied a washer into the rope at these points (one per rope). This way, the ceiling will naturally stop at the proper spot and can not accidentally fall. I then lowered the ceiling to its lowest point, attached all the spikes and raised the spike frame so that the spikes just recessed into the skulls. I marked this point the the spike ropes and attached washers here. Now, just as the ceiling reached its lowest point, the spikes would automatically retract. Once I got the washers fixed in the right place, I pulled the ceiling all the way up and attached the four ropes to a wooden bar. I then tied the other four ropes (for the spikes) to a smaller bar.

I attached some wooden blocks to the frame to hold the bars down near the floor with the ceiling up to its highest point and the spikes retracted just inside the eye sockets. When I wanted to lower the spikes, I pulled out the top bar and slowly raised it up. Gravity did the rest. When I was ready to lower the ceiling, I grabbed the lower (red) bar and slowly raised it up until the physical stops held the ceiling. Of course, I coordinated the movements with this sound file (MP3) I created.
Here is a diagram for the picture above.
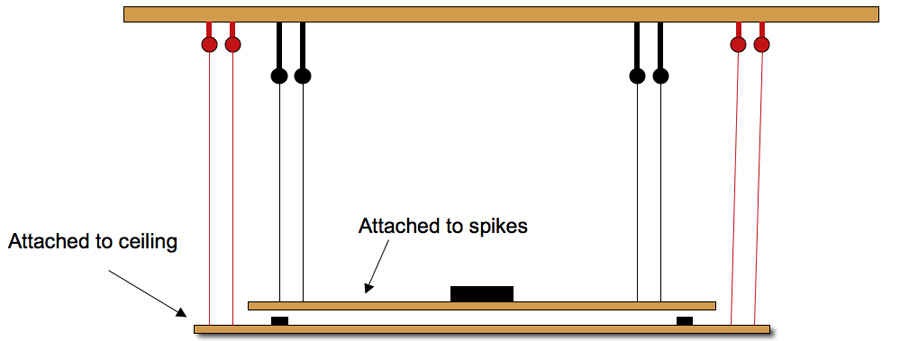
The horizontal bars are held in place by the blocks attached to the frame. You can easily pull the bars away from the blocks then slowly lift them. It is important to try to keep the bar parallel to the floor to keep the ceiling level as it raises/lowers.
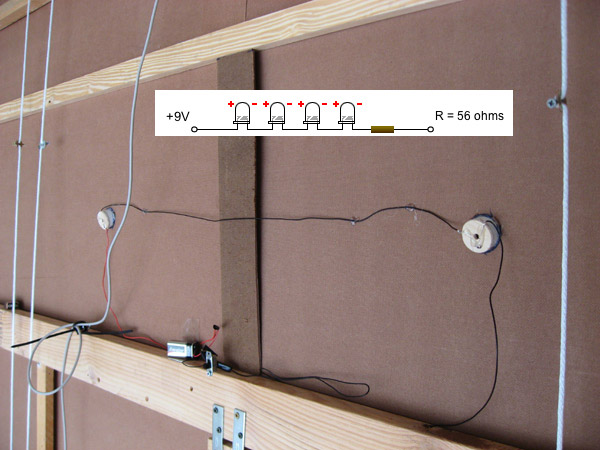
Lighting is an important element of this room. I already mentioned the floor lighting. For the ceiling, I made two simple red LED spotlights. Here is a link to a great tutorial.
I linked two spotlights to one switch. Each spotlight consisted of two high-brightness red LEDs. I drilled two holes in the walls about 6.5 feet from the floor and glued the spotlights in place from the outside of the room. By placing the spotlights high in the room, I didn't have to worry about them being blocked by some parent and they would cast long shadows that got longer as the ceiling dropped. Then, near the end, the ceiling covered over the spotlights effectively turning the lights out at a critical moment. This approach worked out well.
I don't have a picture of it, but I built a box and put it behind the front wall the room, just above the door. I put a talking Boris skull in the box. This Boris coaxed the kids into the room. Once in the room, the back door closed. Then the Boris would start laughing and the "EXIT" sign above his head would slide down in front of him (closing the box) and actually read "NO EXIT". The red spotlights would then turn on and the spikes would lower...