Elevator Simulator 3.0 - the electronics
Note: as with any electronics, please be careful of electrical and fire hazzards. If you don't know what you are doing, don't do it. These setups are simple and use only DC, but wall warts still plug into the wall and can set things on fire. Please use caution.
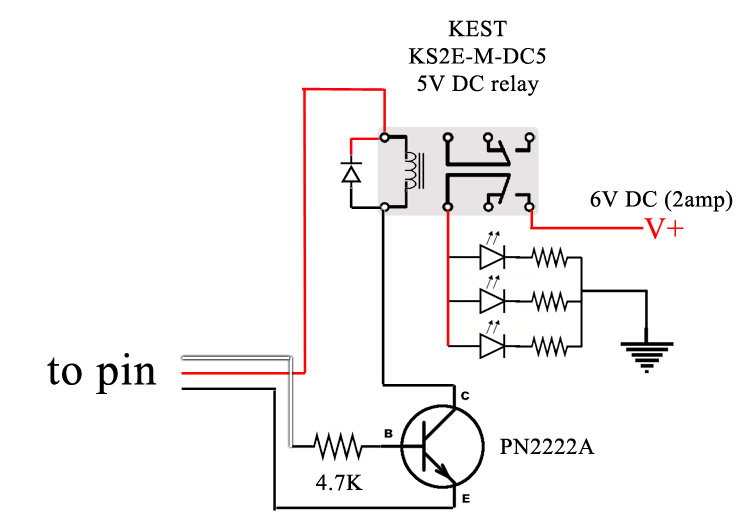
That said, I have white lights, red lights, electromagnets, two servos and a sound card time to control. My choice again was to use a Prop2 controller from EFX-Tech.com (at this point, I am going to assume you know how the use a prop2. It is not that hard and you can download instructions from the EFX-tech web site). Since I was just talking about the outer door, let's start with that. It has a motor (a Faulhaber 2342 with a gear head attachment) and two triggers (the push button to start the elevator and the magnetic switch to tell the prop2 when to stop the motor). The two triggers I attached to pin 14 and pin 15 (pulled them down with the jumpers) and the motor I attached to pin 5. Since the prop2 can not power the motor, I used a simple and cheap 5V DC relay and a 6V DC / 2 amp wall wart to power the motor. The schematic is as follows:

That diode attached across the coil of the relay is a 1N4148 diode. I used that type because I have a lot of those. I think most any diode would do. The relay is about $2 online so I use the trasistor-to-relay setup over and over since it is cheap and compact.
I have a string of 12 white LEDs and a separate string of 5 red LEDs lighting the interior of the elevator. Again, the prop2 does not have the capacity to power these strings. So, I again used a wall wart (the same wall wart I used to power the seervos) and more relays. Here is a general setup for the LED strings (I just show three LEDs below but the real setup had two separate circuits with either five red LEDs or twelve white LEDs. The wall wart didn't need to be 2 amps but it was doing double duty powering my servos as well.
And the sound card had the identical setup minus the wall wart.

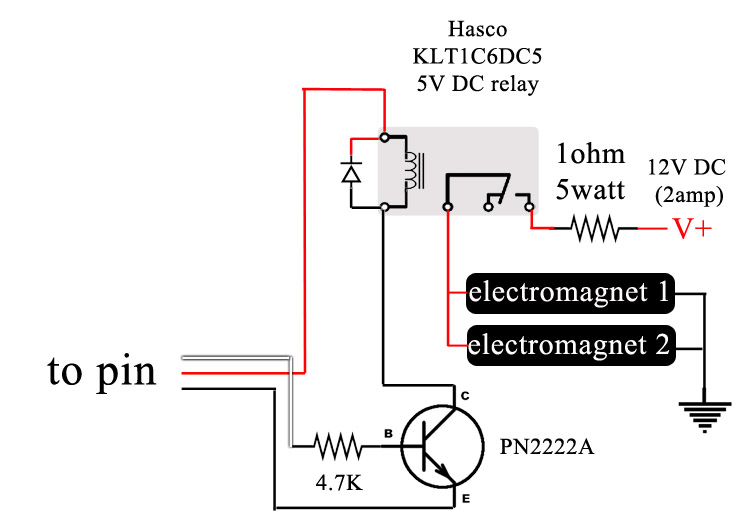
For the electromagnets, I beefed up the relay slightly and used a 12V wall wart. The 1 ohm, 5 watt resistor is there to protect the relay from the initial surge at first contact.
The prop2 can power maybe one servo, but it is better to power it separately. Two servos is definately too much for it. Here is the setup for the servos:

Now for a video...
Next Page
 Home
Home
Copyright © 2012 Garageofterror.com