Elevator Simulator 3.0 - the rotating panels
I knew I could do it. I came real close in 2008. I just needed the right approach. The effect I wanted was to have the kids walk into the elevator, watch the escort close the door, and then for those kids to see that door move up out of sight and to find themselves looking at brick wall moving past a window, until another door appears and opens.
The way I figured I could do this is to make a door that hid a rotating wall scene within it. How? Make the door about 4" thick and put a motor and fabric loop in it. One question I struggled with was how long to make the loop. I had enough clearance to make the door about 7' tall. That means my loop could be about 14' long. If 6' of that is door, then I would have about 8' worth of brick wall for the decent. I would have liked more than 8'. Plus, I would like something to distinguish the "first floor" door from the "crypt" door. I could make the loop almost twice as large if I dared to try a design as shown below.
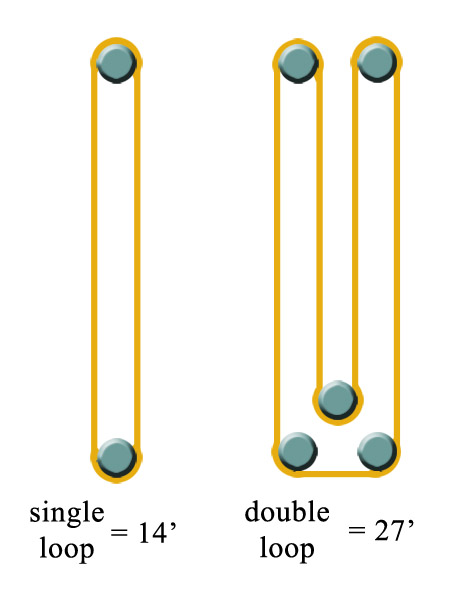
Let me remind you that I have spent many hours building rotating wall illusions only to have them fail. The double loop approach looked like it was asking for trouble, so I stuck with the very simple single loop and just accepted that it was going to be a short ride.
Although the loop was going to be made of fabric, I had no intension of the moving walls being some 2D painted scene. I figured I could make bricks out of 1/4" batting and glue them to the fabric. The loop would still be flexible but have a 3D relief pattern that could catch the light. So, it was off to the fabric store.
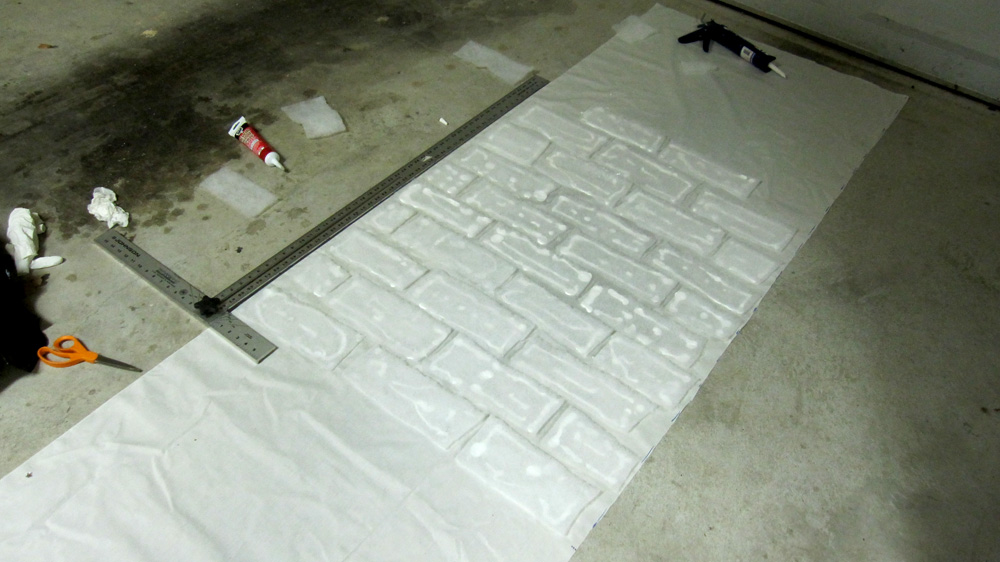
I bought some off-white fabric and 1/4" batting. I also stopped by a discount building supply store and picked up 3 cartridges of flexible adhesive caulk. I cut the batting into squares and used the caulk to glue them to the fabric. You can see the caulk through the batting. Don't worry about that.
I used a light dusting of flat black spray paint to darken the areas between the bricks. I sprayed the paint through a cardboard toilet-paper roll to help keep the stream of spray paint narrow.

I then used some left-over, off-white latex paint (from painting my house) and used a paint roller to paint the batting. I was careful not to get it too thick and I made no attempt to make it look even. Remember, haunted houses are decrepit, not pretty.
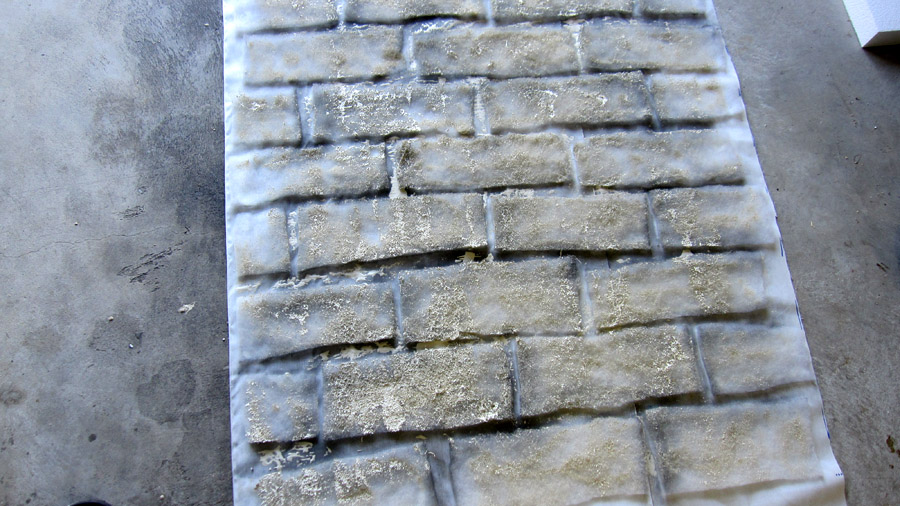
In the dark, this looks really good. I didn't care too much about the edges since those would not be seen.
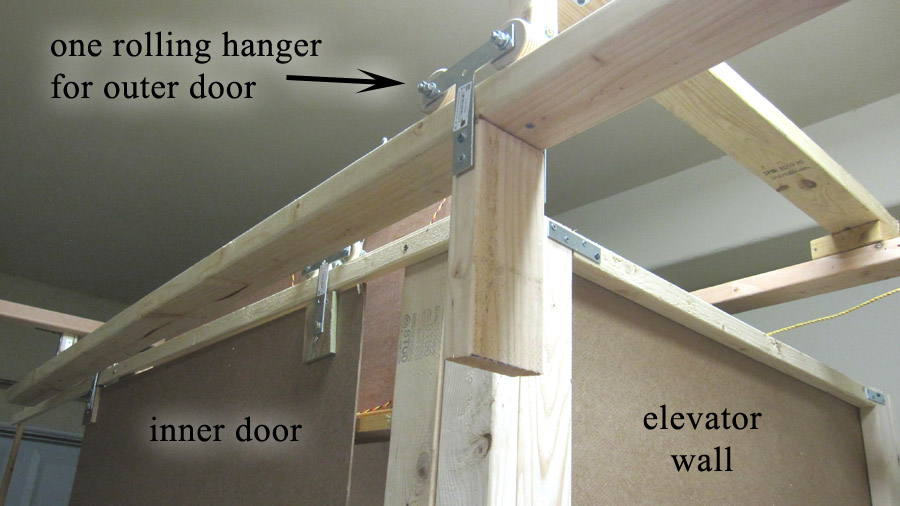
I have found that, for sliding doors, it is best to hang them rather than put wheels on the bottom. Hobby Lobby sells cheap wooden wheels that are perfect for hanging sliding doors. The inner door is just a 4'x7' sheet of hard board with a window (a hole cut into it with plexiglas glued over the hole). I attached the door to the elevator just like I did the other two years with one exception. In the past, I used only two wheels to hang the elevator door. This year, I improved the design by using T-braces rather than a straight brace. That meant 4 wheels, but the door was much better behaved.

Now, the outer door was a different story. It would be about 4" thick (the inner door is only 1/8" thick) and not attached to the elevator. The guide rail for the inner door is a 1.5" x 3/4" x 8' plank. The guide rail for the outer door was a 2 x 4. So, I came up with a different scheme for hanging the outer door.
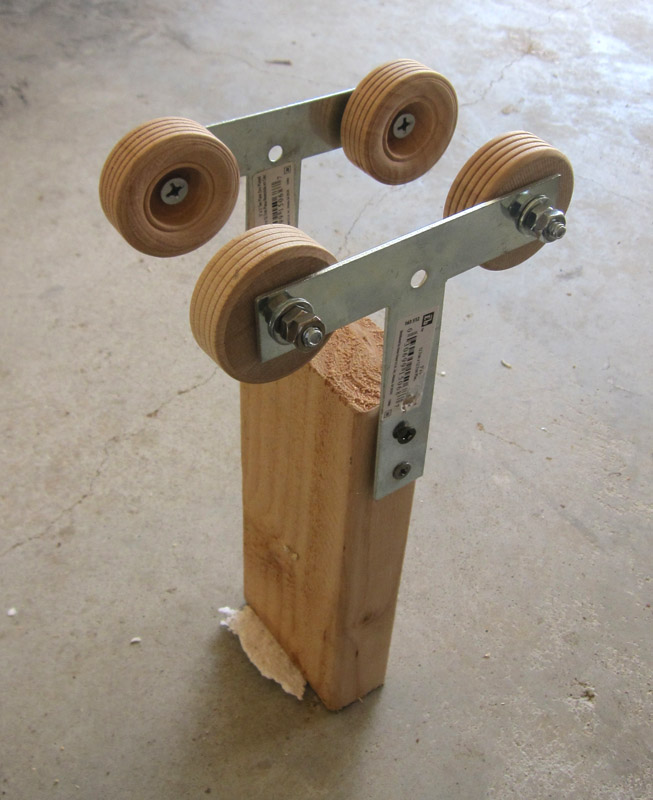
This design was inspired by the Superman roller at Six Flags. I can attach braces along the center of the 2 x 4 and I don't need to worry about the door hitting them (in theory anyway. You will see the door catch on something in the video and it was a wheel grassing a support).

The outer door starts with a motor attached to a roller as shown below.

Notice that there is a board beneath the rail attached to the two hanging blocks. That allows the roller (which is just a cardboard tube) to move freely on the axle and not have to play a role in the door's structural support. Now, we hang the fabric loop.
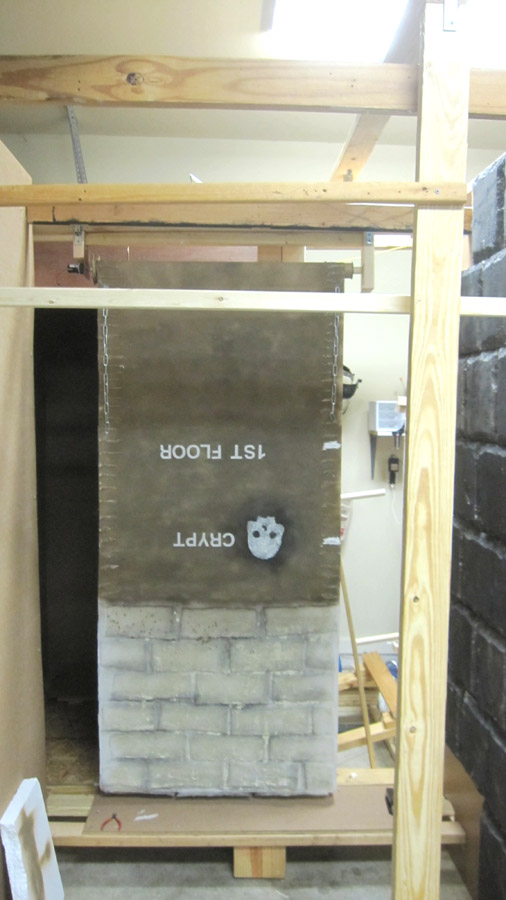
This picture may look a little confusing. What you are seeing is the backside of the outer door (backside from the standpoint of the elevator anyway). You can see brick wall on the bottom of the loop and the brown "door" part just above that (the brown is from spray paint directly on the fabric, by the way). The "first floor" and "crypt" markings on the door are upside down because you are looking at the backside of the loop. They will be right side up on the other side of the loop. But why are both the "first floor" and "crypt" markings so close together? Well, the kids will see the loop through a small window in the inner door. The first thing they will see through the window is the "first floor" marking. When the loop starts, it will move up in the opposite direction of the "crypt" markings. They will see brick wall then the crypt. The loop will stop once "crypt" shows in the window thus, the first floor door and the crypt door have different markings but I did not need two 6' sections of door on my fabric loop.

Taking a closer look at the fabric, you will see some odd things. There are probably better ways to address these issues but this is what I came up with so deal with it. The fabric loop moves because a motor turns on and spins the roller. The only thing that is keeping the fabric moving is friction. Turns out that all that caulk I used to glue the bricks onto the fabric was heavy enough to mess up the weight balance between the "door" which has little caulk on it and the brick wall section that has a lot. So, initially, the fabric would move until it lifted most of the brick wall, but the fabric loop would slip before it could get over the top. There was a simple fix. I just needed to add weight to the "door" side of the loop. Whatever I added had to be flexible to get over the roller. Since no one would see the edges of the loop, I figured a section of small chain would do the trick. It was heavy, flexible and could be easily sewn on. Those stripes along the edge are stips of caulk (painted over) that I used to make the edge of the loop stiff. I did not want the fabric to fold up during operation. The white stripes are actually magnets glued with caulk to the loop. Those magnets will tell the prop controller when to stop the motor. I then sealed up the right edge of the door with wood, the front face with cardboard (to keep it light) and used a section of 2" PVC pipe at the bottom fo the door to put tension on the loop. Here is everything in a video.
Next Page
 Home
Home
Copyright © 2012 Garageofterror.com