Description: This was originally an ambitious project but I was not able to pull it off in the time allowed. So, I compromised with a simpler design. I like the idea of "trapping" the kids inside a haunted house to give them a sense of no escape. Putting them "underground" also gives a certain sense of claustrophobia. I will start with a description of the design that didn't work with the hopes that someone tries it and suceeds.
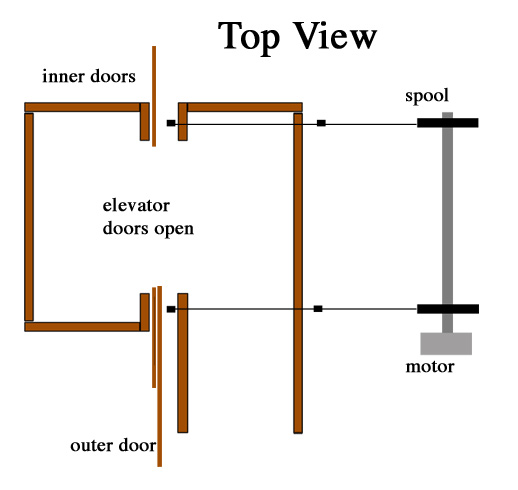
The Design that Failed: With this elevator, you lead the kids though a set of two doors to a small elevator. The inner door has some holes cut through it so that you can see part of the outer door. When the elevator starts, the floor shakes and you can see the outer door move up followed by brick wall then a new chamber. The doors open and the kids walk into a completely different room.
Approach
The elevator is built on a raised platform on springs. My elevator is 6'x4'x6' is big enough to fit four - six people at a time (assuming at least one of them is a kid). The illusion works through fake panels that are originally hidden from view by walls and ceiling. Likewise, the track that the panels run on are hidden in the raised floor and behind wall panels. The two images below show the side and top view as you are leading the kids into the elevator.

After I close the inner and outer set of doors, I will raise the front set of spools and run the panels up to the outer door. The first few panels are a duplicate of the outer door. I will then briefly turn out the lights in the elevator and open the outer door remotely by pulling on a rope. I then turn the lights back on and they will never realize that the outer door has been switched. I then (safely) drop the weights to make the elevator jolt and start the panels moving. as shown in the picture below.

The Actual Design:
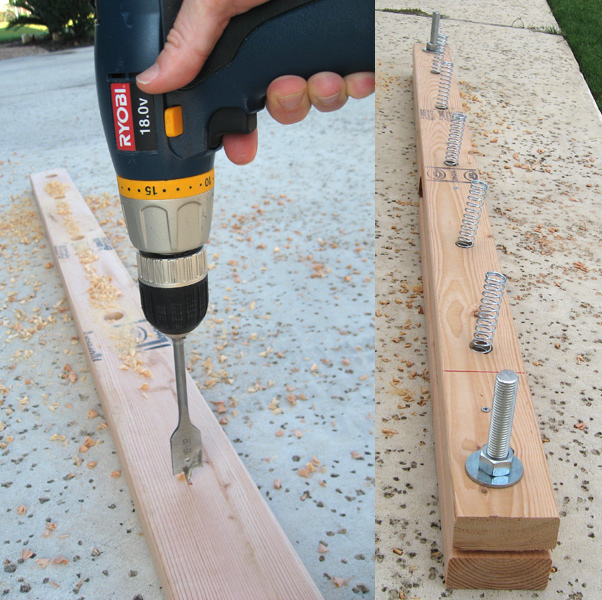 For the base, I stared by boring a bunch of holes into two 6' 2-by-fours using my hand drill and a "Speed Bore" bit I bought from Home Depot. I also bought a 2' section of 1/4" threaded bolt and (sigh) cut it into four 6" sections with a hacksaw. The lady at Home Depot assured me that it was soft steal and would cut easily. Actually, it wasn't that bad. I drilled seven holes in all evenly spaced. The five center holes a bored 3/4" deep and the holes at the end I drilled all the way through. The the five center holes I put compression springs (rated 25 lbs, Home Depot again) and put the bolts through the end holes. I attached it to another two-by-four with a couple of screws but bored a hole large enough to fit the hex nut so that the boards would lie flush.

When I tested the springs, I found that they were way too soft (I planned on using 25 of them). Well, a co-worker had some old valve springs from his Chevy so he gave me some. These are really stiff so I just needed five of them. You can get valve springs from an auto shop or maybe you can go to a garage and get some old ones for free. Anyway, the valve springs are the black cylinders in the picture. I used a bore bit to sink them 1/4" into the wood then made my 4'X6' frame (actually, it's a 6'x6' square but the actual floor will be 4'x6').

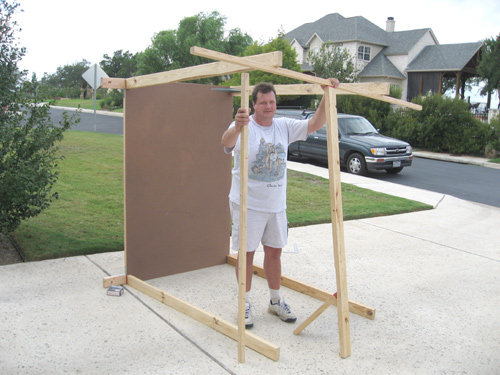 For the floor, I took two 6' two-by-fours and bored holes through the ends so that they would slide freely over the bolts in the base. I then cut 5 two-by fours to 5'5" and attached them to the 6' sections with brackets, spaced out one board per foot. This created a good support for the 4'x6' hardboard floor (you can get a thick 4'x8' hardboard panel from Home Depot for about $9. Get the thicker one so that the kids don't put a foot through it - they will jump up and down once they sense that they are on springs. Actually, I am going to used two boards just in case. After attaching the hard board panel, I attached 6' two-by-fours to each corner with screws and brackets. I have always done my haunted houses completely on my own. This time, a actually needed help, so I recruited my friend John to hold a few things for me. Thanks John!
 We then placed the floor over the base, sliding the bolts through the holes in the floor support and used large hex nuts on the bolts to secure the floor to the frame. I did not tighten the nuts down because I wanted some movement. The elevator floor ended up with just the right amount of flex, that is, just enough to move a few millimeters when I stood on it but not enough to feel like a trampoline.
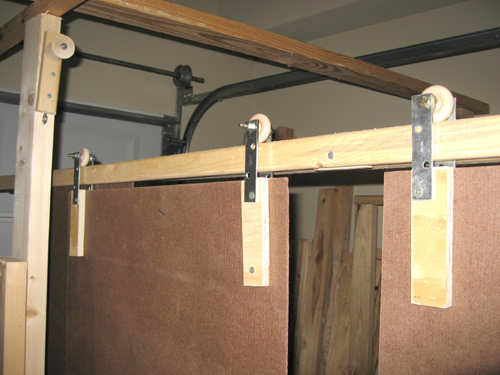 I wanted the doors up open from the center like most elevators. This haunted garage will use a total of five rolling doors and I was frustrated to find that rolling wheels at Home Depot were relatively expensive. Then I found, quite by accident, a big score at Hobby Lobby. They sold a whole bag of wooden wheels for less than $4. Perfect! So I made the doors from the same hardboard I made the elevator floor out of (but used the thinner panel for better weight and cost) and used some 4" brackets to attach the wooden wheels. Two wheels per door worked fine. I used several washers to keep the wheels centered on the track, which is just a 1"x1/2" board. I found that suspending the doors from the top was much better than putting the wheels on the bottom of the doors.
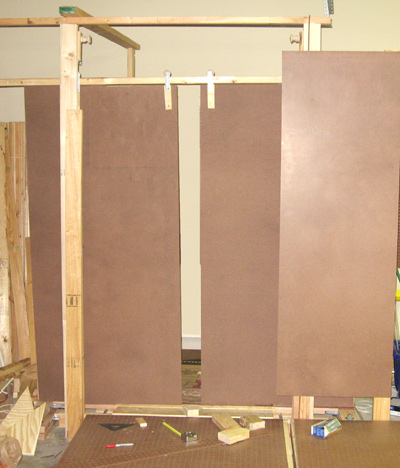 It's starting to look like an elevator.