Strategy: It would be relatively easy just to make a talking skull for my fortune teller. However, I wanted to put a scare at the end of his talk, or he would be nothing more than a creepy fortune teller. So, I thought it would be cool if his head flew forward at the last minute and floated in the air just a few feet from the kids. This meant three things. First, the skull would have to be put at the end of a long black pole and all operating electronics would have to be either in the skull or on the pole. Secondly, the neck vertebra would have to twist and track with the skull without being attached to it. I felt it was important to make the neck move to convince the kids (subconsciously) that the head was actually attached. This would make the surprise bigger. Thirdly, I had to support the hood of the cloak with something so that it would keep its shape when the skull flew out and back.
Making the Skull:
I used liquid latex over a skull I bought from a Disneyland magic shop about forty years ago. I tried initially to use Great Stuff as my hard shell to keep the latex in place but that did not work very well. So, I remade the latex mold and this time used plaster and cotton gauss for the hard shell but still used Great Stuff to fill in the rest of the box.
Working with two-part polyurethane foam takes practice. The key is in the mixing. I used a bend coat hanger stuck in my power drill and mixed the components in a clear plastic cup. By the way, make very sure you don't have any sharp edges on your mixing blade if you do this. I always tested out the mixer in the cup before I poured anything in it and more than once did the coat hanger rip right through the cup. The key was to bend the coat hanger so that the blade width was about half the width of the battom of the cup and the end of the wire was protected near the center shaft. Anyway, if you mix too long, you don't get the fine details of the mold. If you mix too little, you get a sticky, toxic skull with large gaping holes in it. So, if it is you first time, buy extra foam.
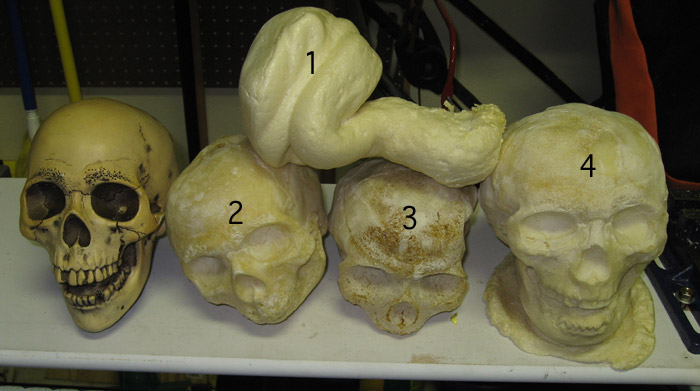
The 6 lbs foam worked for me. I used a Dremel to carve out the nose, jaw and teeth. I carefully carved the jawbone free from the skull and reattached it with wire hinges. I also used a 1" bore to drill a 1" hole in the back of the skull. I made this hole penetrate about three inches. This is the hole I will use to attach the skull to the black PVC pipe.
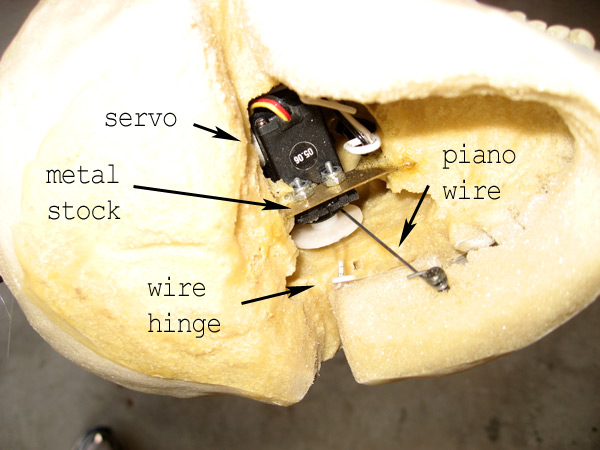
I used the "Scary Terry" approach for making the skull talk so I will let him give you the details here. Once I carved the 1" hole in the back of the skull, I used my Dremel to hollow out enough of the interior of the skull cavity to fit the servo motor. I also made sure the 1" bore through the back of the skull went deep enough to meet with this cavity. I mounted the servo onto a thin piece to metal stock I got at the local hobby shop (used for making model planes) and attached (glued) the metal stock to the skull. This did a good job of securing the skull. I then ran the servo wires out through the 1" hole in the back of the skull. I used piano wire to attach the servo motor to the jawbone, similarly to the way "Scary Terry did it."
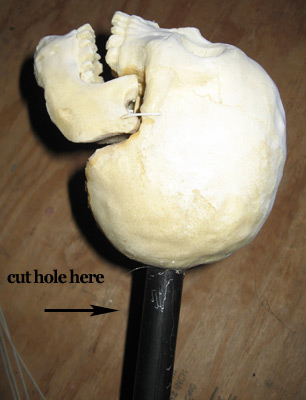
I spray painted some 1" PVC pipe black and hot-glued it to the skull. The servo connection was only a few inches long and I needed it to run about 6' out the end of the PVC pipe. So, I bought a 6' extension for servos from the same hobby shop I bought the metal stock from. I also cut a hole in the PCV pipe near the base of the skull. This way, I could access the connection of the servo motor to the extension cord. Otherwise, if this connection were to come off, I would have to remove the pipe to reconnect it.
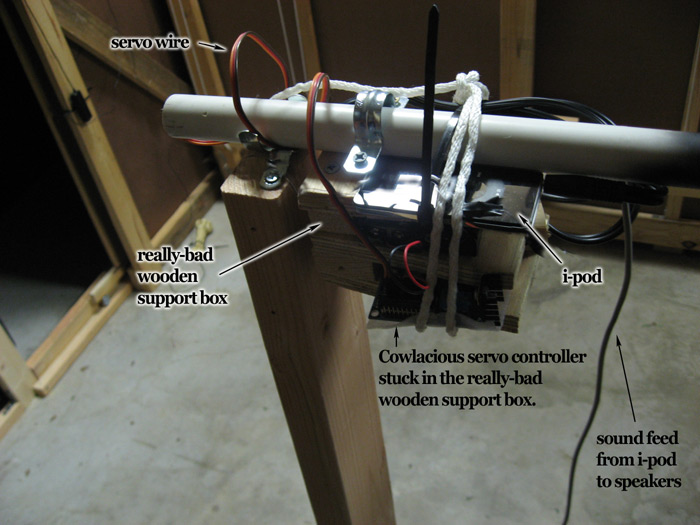
At the other end of the 5' long PVC pipe, I attached a make-shift wooden box to hold the servo controller (I bought it from Cowlacious rather than making it myself. I made sure the box hung down below the pipe when the skull was oriented upright. This way the skull would naturally stand straight up. Also shown in the picture is the wooden support and a metal support bracket to hold the assembly up when I am not moving the head (more on that later).
Neck
OK, we have a foam skull at the end of a black PVC pipe with a servo motor controlling the jaw and a servo connection wire running inside the PVC pipe to a severo controller attached to the other end reacting to the sound of an i-pod. Now, let's make a neck. Much easier.
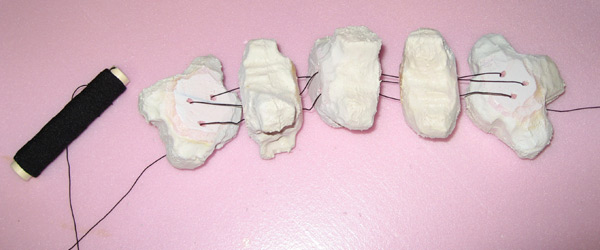
I carved five vertebra out of foam board. I used half-inch foam board so I had to glue two sheets together to get the right thickness. OK, my vertebra aren't nearly as good as Vile Things but al least mine can twist. Along those lines, before I painted anything, I coated the carved pieces of foam with a couple of coats of Minwax polyurethane schelac. This gave the flat foam area a hard, smooth surface that did not catch when the vertebra rubbed against each other. To get the neck to work as a unit, I bought some elastic thread from a fabric store and passed it through the vertebra three times as shown. Now, when everything is tightened up, if you twist the top vertebra, the second twists almost as much, the third a little less and so forth.
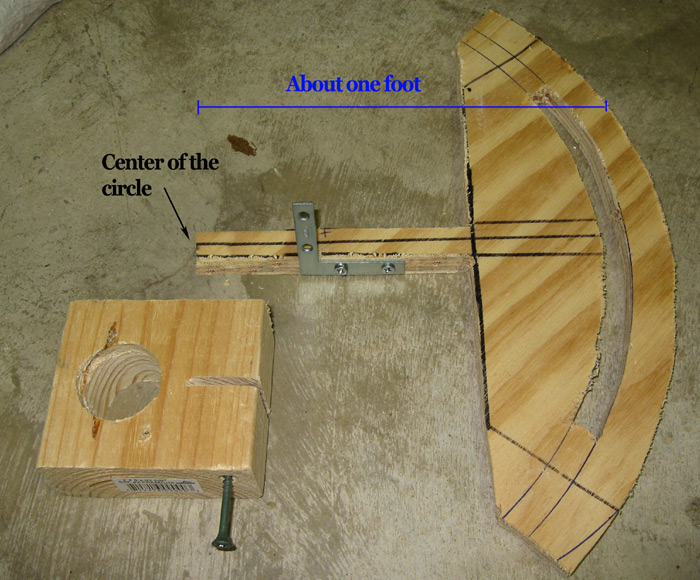
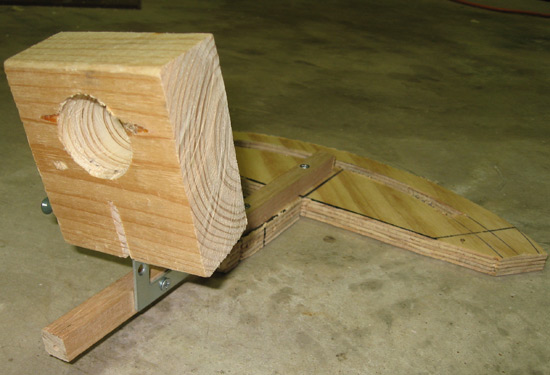
Now, we need the neck to move with the skull motions. To do this, we need to do a little trick. The thing is, the head needs to pivot around the neck, but the actual support for the head will be about one foot behind the neck. To fix this issue, I cut a wedge from some plywood as show below. To make the wedge, I used a compass to draw a circle (really just an arc) that was 12" in radius and 12.5" in radius. I used a jigsaw to cut out the arc then cut the wedge as shown. The center point will attach to the uppermost vertebra of the neck. I also attached an L-brace to the center shaft and made a block with a 1.25" hole bored through it. This piece will support the PVC pipe (described later).

Hood Support
The hood support is just a piece of chicken wire with some paper mache over it. I molded the chicken wire over the skull to get the shape right (I didn't make it form fitting, though. I made it a bit bigger so that the skull can move in and out easily without dragging). Before adding the paper mache, a wove two pieces of clothes-hanger wire through the mesh for support. These wires will hold up the mesh and the cloth hood. I glued the cloth hood to the mesh to keep it from sliding off.

Putting it All Together
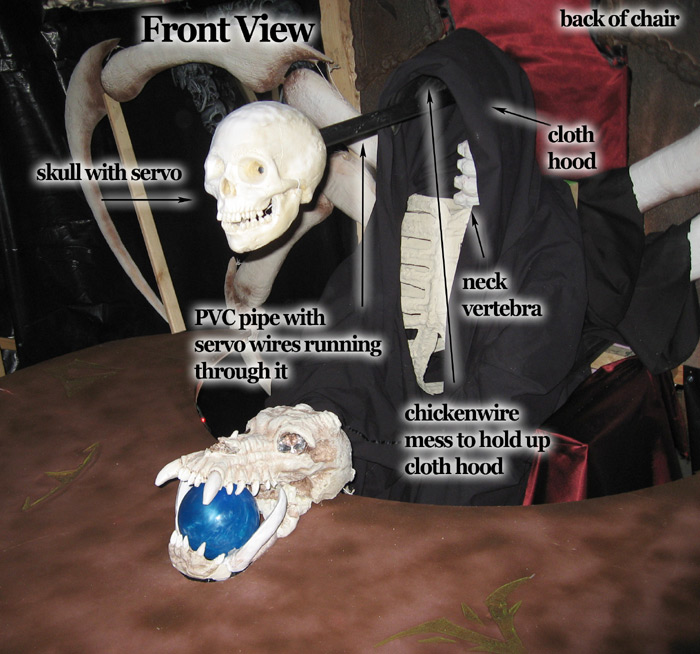 So, from the front view, you can see the free-floating skull, the PVC pipe, the neck vertebra and, if you squint, the black paper mache mesh that is holding up the cloth hood.
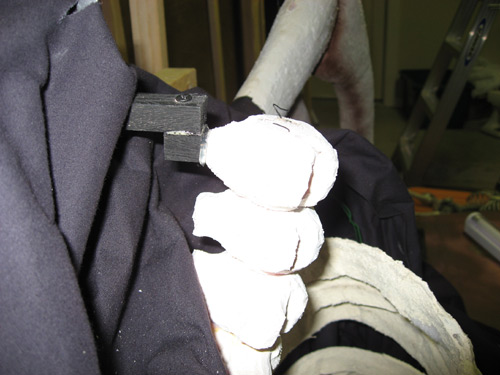 The bottom of the neck is glued to the sternum and the top is attached to the center point of the wedge shown earlier. I had to lower the point of attachment slightly with a small block of wood because I was stretching the neck too much. I used a nail and a glue gun to attach the vertebra and made the attachment at the very back so that the wood (now painted black) was not visible from the front.
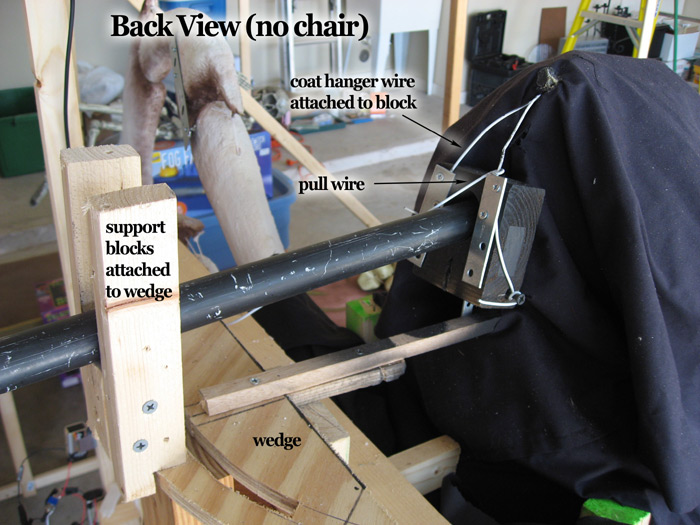 The fortune teller is sitting in a wooden chair. The chair has a foam-board back (which is removed in this picture) and a 2x4 post that runs behind the back of the chair and stops at head level. You can't see it well in this picture but the wedge is resting on it. In order to support the PVC pipe better, I created a U shape with three blocks of wood and attached it to the wedge. The bottom of the U is even with the hole bored through the front block. I did not close the top of the U and put the front block on a pivot so that I could lift the back of the PVC pipe and make the fortune teller look down into his crystal ball. I attached the two coat hanger wires from the chicken wire mesh to the back of the block. This way, the mesh moved with the skull. I soon found it was necessary to attach a "pull wire" to the block. I had to pull slightly on this wire just before I made the skull leap forward. Otherwise, the front block would drag on the PVC pipe. Notice that the front block of wood is behind the cloth hood. It is better hidden that way. The PVC pipe slides through a hole in the back of the hood.
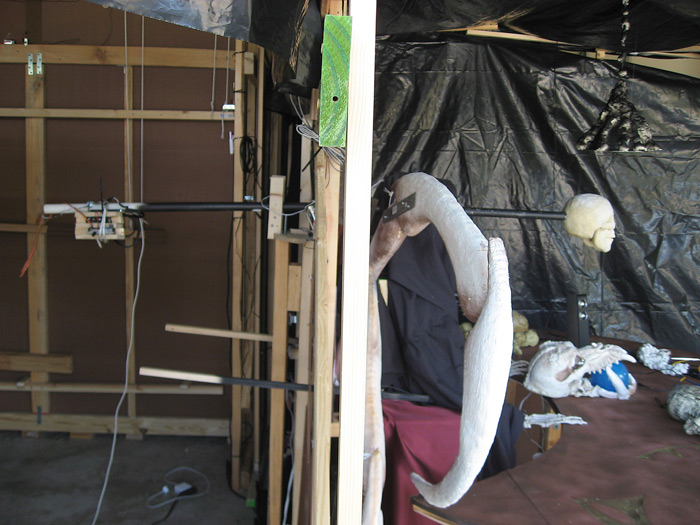
 This picture shows the PVC pipe, wedge and pull wire running through the back of the chair. As you can see, it all fits through a small slit. This picture also gives a better view of the 2x4 that is supporting the wedge. You can also see the "pin" that is guiding the wedge. This pin is simply a 0.25" in diameter bolt with the head cut off. I drilled a 0.25" hole into the top of the 2x4 and glued the support pin in place. Now, to make the skull look side to side, I could grab the U block (letting the end of the PVC pipe rest on my forearm and elbow) and slide the wedge side-to-side. The support pin helps keep the wedge on track so that it pivots around the center point (now the neck vertebra). Note that the movement of the skull is limited because the wedge itself must stay behind the back of the chair. My fortune teller could look about 20 degrees to the left and right. When at rest, the end of the PVC pipe would rest on the 2x4 support I mentioned much earlier in the tutorial. This support stood about 5' back from the chair.
You know, you thing you are taking good pictures while you are building the thing but they always seem insufficient when you go to write a tutorial. So, sorry if that seemed like a lot without great detail. It really isn't that hard so let me recap.
- Make or buy a skull with a moveable jaw.
- Make or buy a servo controller that reacts to sound.
- Instal a servo into your skull so that it can move the jaw.
- Attach the skull to one end of a PVC pipe and the servo controller to the other end.
- Make a wedge from some plywood. Cut an arc out that has a center focus around the end of the stick you will attach to your neck vertebra. The purpose of the wedge is to act as a guide so that you can make the skull pivot around a neck it is not attached to. It will also hold the skull in place when you are not around. Put a U shaped block a the back of the wedge and a block (that can pivot) with a big hole in it near the front.
- Make five vertebra from foam board. String them together with elastic.
- Attach the bottom vertebra to the sternum. Attach the top vertebra to the wedge.
- Fold some chicken wire around your skull. Run some coat hanger wire through it for extra support and let those wires run out the back. Encase the chicken wire in a coat of paper mache and paint flat black.
- Attach the ends of those coat hanger wires to the front block of the wedge so that the hood will move with the skull.
- Attach a wire to the top of the front block so that you can pull the block back a little when you want to slide the PVC pipe through it.
- Attach i-pod to speakers. Fin.
Here is a video. Unfortunately, his wrist has gone limp and the spines are not moving. He had a hard Halloween and this was shot the day after.